Showing posts with label crafting. Show all posts

DIY White Board Makeover

02 September 2015

I love simple DIY projects that you can make out of items you already have lying around. One Sunday morning, I couldn't stand to look at my bland, under-utilized white board any longer. So I did what any crafty person does: look up a DIY project on Pinterest! But I couldn't find anything quite right for me - I don't need to organize a whole family, and because my whiteboard isn't in the most visible place, it's not ideal for reminders or important notes. I decided that what I most needed was a month-at-a-glance calendar, a place where I could write down the big events and see the month as a whole. Below is a picture of my whiteboard "Before" - you can see that it was really just a place to store random photos, drawings, and magnets. Not exactly functional or beautiful.


What better way to quickly make something cuter than washi tape?! First, I cleaned the entire board with a Mr. Clean Magic Eraser, and I chose a tape that goes with the decor of my room - a gorgeous, 30mm (about 1.18inches), hot pink and blue washi tape made by Scotch. I then covered each of the silver edges with that tape, carefully lining everything up. Then, I started creating my calendar. I used a gold washi tape I found in the Target Dollar Spot, and I actually needed two rolls to get through the whole project! I used a ruler and a dry erase marker to place dots at 3.5inch increments (that will leave a 3inch square of space to write, the tape is about 1/2inch thick). I left a space at the top for the month and days, and I made five squares down and seven across! There's also a good 6inch space to the right of the calendar to put a magnetic notepad, a container for dry erase markers, and magnets.

As you can see, it looks much better! Not only is it more functional, but it looks a whole lot cuter too. I also discovered that with the 3inch squares, I could use sticky notes to mark the really important stuff!
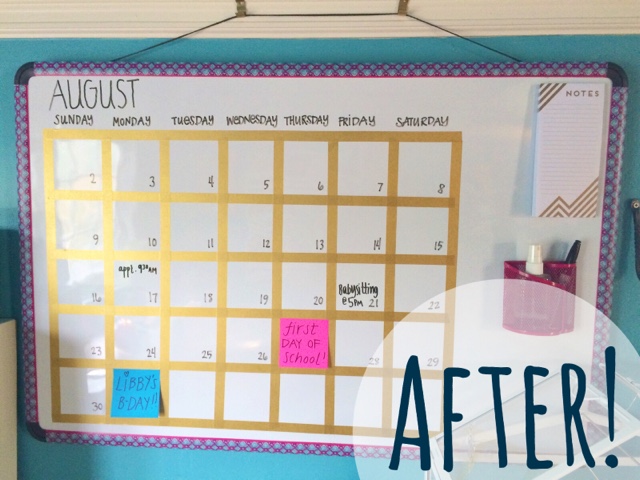


Instead of a generic, old-looking white board, I now have a bright, unique white board calendar that I love to use! The solution was quick, simple, and inexpensive! 

Anybody else out there love a good DIY project? Be sure to follow me on Pinterest to see all the cute & crafty things that inspire me! 

XOXO

How I Decorate My Moleskine Planner

26 August 2015

Using a planner is a great way to stay organized, but I think it can also be a wonderful way to express your creative side. When you create a beautiful place to keep track of appointments, projects, lists, and to-dos, you're more likely to stay on top of them. While I love the Erin Condren Life Planners and the Ban.do Agendas, my planner of choice at the moment is an extra large Moleskine with weekly pages. The left page holds Monday through Sunday, while the right page is lined for notes and lists. I loved this format for school because I had plenty of room to write assignments and due dates, and also room to brainstorm, take notes, or write myself reminders. 

When I decorate my planner, I usually start by picking out a few washi tapes I want to use and then finding some coordinating pens. I also use a lot of rubber stamps in my planner - from alphabet stamps, to birthday stamps, to random stamps like a baseball player to mark my brother's baseball games. Above, I've gathered three washi tapes - the green grid tape is from the Target Dollar Spot, the polka dot tape is made by Scotch (can be found at many home & office supply stores), and the pink zig-zag tape I purchased in a set from HomeGoods. As you can see, you can find supplies to decorate your planner with at many different places! 

This is what my planner generally looks like on Sundays when I'm planning for the week ahead. I'll decorate the top section where there's a small month label that I usually try to cover up! I used these Lawn Fawn alphabet stamps for "August" and "Mom > Work", and I used Target Dollar Spot alphabet stamps for the "Bro & Me" and "First Day of School" labels. I also used these date stamps for the location-pin and arrow. (I also use these "my week" stamps a lot!)

I like to put a "workout log" on the right page to write track my exercise throughout the week. I find that if I write out each day and leave a space, I'm more likely to actually work out! I don't want to look back and see an empty workout log... plus, it feels good to write out what exercises I did. Like a little pat on the back!

As the week goes on, I write in more appointments, to-dos, and events, but my life is pretty day-to-day right now. I like to capture the big-picture for the week and fill in the details later. 

I hope this post gives you a little inspiration for decorating your planner! It's one of my favorite Sunday routines - sitting down with a cup of coffee and craft supplies to plan while listening to music. 

What are your favorite ways to decorate & use your planner? Which kind of planner do you use? 

XOXO

Target Dollar Spot Haul

27 June 2015

The Target Dollar Spot is a dangerous place. Everything's only a dollar (or three), so it seems like such a good deal. But then you realize you picked up $20 worth of stuff before even really getting into the store!

But honestly, I LOVE the Target dollar aisle. They actually have a lot of cute craft and office supplies, and the selection is constantly changing.

One of my favorite things to buy is their $3 alphabet stamp sets. I love to stamp on tags, in my planner, or when I'm card making, so alphabet stamps and numbers are really handy. I also picked up another $3 set of stamps with cute greetings (I couldn't help it!). And also pictured are some sticky notes and flags. They're not the best quality, but you can't beat the price and they sure are cute!

 I then found these notecard sets... I really can't resist! I have always loved stationery and these $1 sets are so cute. There are 8 card and envelopes in each set, which seems to be the perfect amount - I usually send out thank you notes in small bunches, and don't want to send the same design to the same person multiple times! So small sets are ideal. 

Who else loves Target?! Or office supplies & stationery? I always love stuff that's cute AND functional. As Hannah Montana would say, it's the best of both worlds! 

XOXO

Washi Tape Organization

03 June 2015

I have a slight obsession with Washi Tape... Well, I guess any kind of decorative tape really. One of my favorite craft stores has a whole wall of it, and with the dollar aisle rolls at Target, my collection has grown exponentially over the last year. Before, I just kept the rolls in an Ikea box - so they were organized, but every time I wanted to use one I had to pull out the box and dig through for a specific one. Now, it wasn't particularly inconvenient, but when I spotted this thread rack at a moving sale, I knew right away I had to have it for my tape.

 There's a stand on the back that props the rack up, making it sit about six inches away from the edge of my desk. My desk is pretty wide, so this isn't much of a problem for me. The rack had one broken peg - probably why it was being sold - but it doesn't bother me so much.  I was worried that I wouldn't be able to fit a roll on each peg, for some of the rolls are wider than the spaces, but I have some smaller rolls (that I found at HomeGoods) that fit perfectly. I imagine that I might have an issue if I needed to use each and every peg... but I'll cross that bridge when I get to it! Right now, I'm just glad to have a cute display for all the bright & colorful rolls. It's really convenient to have it all right at my fingertips to use in my planner or on notes. 

Aren't garage/moving sales the best?! How do you organize your washi? 

XOXO

Sewing Box Organization

11 May 2015

I found this sewing box on a recent trip to a Jo-Ann store, and couldn't wait to fill it with my sewing supplies! I've always been interested in sewing, doing the occasional project, and collecting cute notions and fabrics. However, until I got this sewing box, my supplies were kept in a rubbermaid tub in our basement - not cute or convenient! This box in particular had my name on it - I love fashion illustration, especially the images on vintage patterns like the ones on the fabric of this box. 

I'm not going to go through everything I've decided to keep in my sewing box, but I thought I'd share what I consider my sewing essentials. In the pockets on the lid of the box, I just have some snaps and a set of needles. 
 This top tray is very useful for tools that I use often or like to keep handy during a project: 
  • Needles
  • Pins & Pin Cushion
  • Seam Ripper
  • Measuring Tape
  • Washable Marker & Sewing Chalk (for marking fabric)
  • Needle Threaders
  •  Buttons
  • Scissors (for thread, though I still need a nice pair for fabric/ribbon)


I also have some permanent fabric pastels and a tool for fixing sweater snags, but I wouldn't consider those essential.
 In the main compartment, I keep...
  • Thread - on Spools and Bobbins
  • Safety Pins
  • Fabric
  • Snaps - Pieces and a Snap Setter
  • Zippers
I love organizing solutions that are stylish and functional. Having all my supplies organized and handy makes me excited for my next sewing project! 

XOXO